| Creating
Your Own
Controller So… How do you make the camera take multiple pictures at a fixed interval automatically? There are solutions available commercially, but I found these a little expensive for my budget, and hey, I like to tinker. Here they are: Existing solutions on the market - What's available out there. The Super Timelapse Maker 2000 Plus - LCD, keypad, microcontroller: an intricate beauty. The Timelapse-O-Matic - Free program download for Canon cameras. Portable battery-controlled TimeLapseTron - Easy DIY timer in enclosure with extras. TimeLapseTron v2 (Solid State Edition) - Improvement on the previous: Cheap, easy to build and reliable. Detailed instructions included. As you can see, I'm pretty fond of cheezy names. Existing solutions on the market Cameras that have a dedicated time-lapse control or external remotes (like this) are one solution, although the price is sometimes prohibitive, and sometimes the available intervals are usually too long for subjects other than stars and sun motion. Some bundled software is also restricted to 30 second intervals or longer, which is way to long for my taste. That's why my friends and I set out to create a more "flexible" system. I know there are nice solutions out there (such as the DigiSnap 2000, Mumford Time Machine and Pclix LT100). The Super Timelapse Maker 2000 Plus 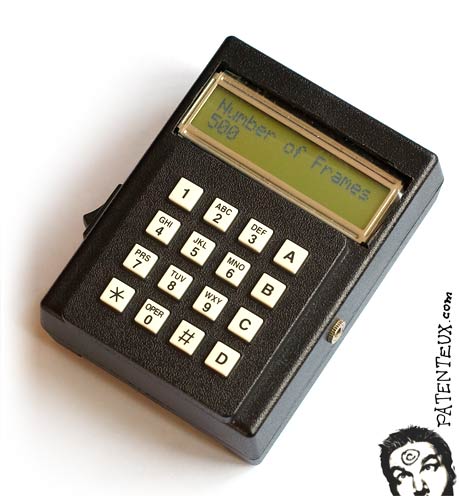 This was actually designed by my friend Étienne. The characteristics are impressive: Numeric
keypad
interface
Backlit LCD with text menus Animatable interval duration (changeable over time) Animatable pulse duration (bulb timer)  This
thing is amazing, you just type in the interval duration and the number
of frames you want in a
menu (it supports decimals!) and it starts taking pictures with superb
accuracy. LCD feedback shows you the number of frames taken and even
counts down the duration until the next frame. This
thing is amazing, you just type in the interval duration and the number
of frames you want in a
menu (it supports decimals!) and it starts taking pictures with superb
accuracy. LCD feedback shows you the number of frames taken and even
counts down the duration until the next frame.There were however a few issues : Limited
battery
life
Complicated to build and to program Had a few bugs Sadly, the gizmo used to program the device has since broken, and needs to be rebuilt, so work on the invervalometer has been interrupted. There are plans for a v2.0 version with an improved microcontroller, but that may take a while… Since only one of these exists, I set out to make a invervalometer of my own. The Timelapse-O-Matic 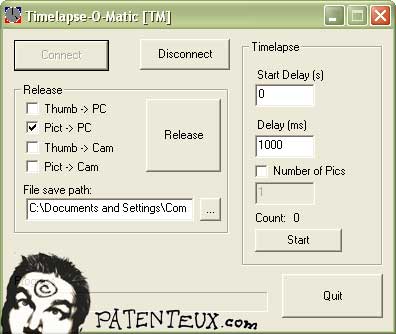 This is an extension of the Software Developer Kit (SDK) available for Canon cameras (thanks Canon), tweaked by my friend Charles. Here are the highlights: Software
program
to control shutter of Canon SLR cameras via USB
Allows automatic transfer of frames to computer hard drive Allows for any interval duration My friend Charles tweaked this for me really quickly and I’ve used a few times. It’s an improvement to Canon Capture (the program bundled with Canon SLRs) which only allows for durations above 30 sec. It works great except for a few known issues: Needs to be
permanently connected to a computer
Length of wire limited to USB specifications Duration of time-lapse limited by capacity of laptop battery Compatible with Canon cameras only  To install it, just unzip the file and
double-click Timelapse-O-Matic. In the window that pops up, select the
camera model you have. You’ll need to have
the Canon SLR drivers
already installed. To install it, just unzip the file and
double-click Timelapse-O-Matic. In the window that pops up, select the
camera model you have. You’ll need to have
the Canon SLR drivers
already installed. Just make sure that when you use it, you at least download the thumbnails to camera (or else it freezes). BTW, thumbnails are great to make a quick preview movie of your time-lapse (you can even do it while you're still shooting). You can download the software here (sorry, Windows only). If you want to improve on this program, I can send you the source code on request. Portable battery-controlled TimeLapseTron 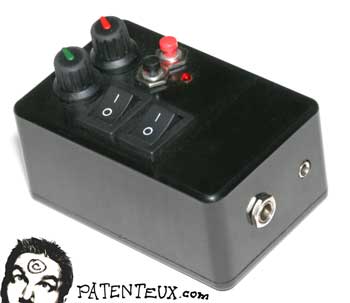 This
is an interesting one because it can be made by just about anyone.
It uses a Velleman
MK 111 interval timer kit at its root. Here are its
advantages: This
is an interesting one because it can be made by just about anyone.
It uses a Velleman
MK 111 interval timer kit at its root. Here are its
advantages:Cheap
(around 20
bucks)
Interval duration 1 sec to 1.5 minutes Pulse duration up to 30 sec Battery or AC powered Can also be used as a wired remote and bulb timer Issues: A relative
battery
hog
Limited in terms of pause duration I will describe this one in more detail so you can make your own if you want. Start off by getting your hands on a Velleman MK 111 interval timer kit. This can be found at on-line electronics suppliers for about $10 (cheaper than buying the parts individually). It is sold as a kit; i.e. you need to assemble it. It only requires basic soldering skills. If you’ve never soldered, you can also get this kit assembled for about double the price. This device is just an time interval-adjusted contact closure (an on-off switch). You’ve got two controls: pulse and pause duration, which are adjusted with two mini potentiometers (dials). You just need to give it power (it is rated at 12-18vdc). You can make it work with a single 9v battery, but I’ve tried it and as soon as the battery becomes weaker, it isn’t able to perform the “switch”. I’d recommend two 9v batteries in series. The most basic version of this timer can be found here (as posted on the DPReview forums). Note the absence of enclosure and the single 9v battery (I'd add a second one). To connect this invervalometer to the camera, there are a few options which are explained on the Camera page.  I’ve
improved on the kit a little more. I set it in an enclosure and
added full-size dials and trigger, bulb and focus buttons. I've
included
a 1/8 inch jack for camera interface and a power jack for either two 9v
batteries or a 12v DC wall adapter. All that is needed to do this is to
extend wires from the holes on the kit board to the potentiometers,
switches and LED. I’ve
improved on the kit a little more. I set it in an enclosure and
added full-size dials and trigger, bulb and focus buttons. I've
included
a 1/8 inch jack for camera interface and a power jack for either two 9v
batteries or a 12v DC wall adapter. All that is needed to do this is to
extend wires from the holes on the kit board to the potentiometers,
switches and LED.TimeLapseTron v2 (Solid State Edition) Since this one is a more "mature" controller and is easy to build, I've included more info on how to assemble it. 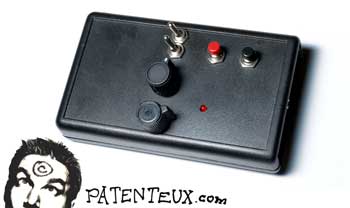 This one is based on the TimeLapseTron invervalometer (above) but with much better battery life. This is because we removed the relay used to close the circuit (the actual switch). A relay like this is really overkill when all you need is to do is trigger a camera shutter (a relay is designed to handle a lot more voltage). That’s why my friend Étienne suggested making the same invervalometer but replacing the relay with a transistor. The specs: Cheap!
Runs forever on a single 9v battery Quiet Reliable Can be used as a wired remote and bulb timer Here's what you need: one Velleman
MK 111 Interval Timer Kit
one 2222 transistor two 120 K resistors one 9v battery connector Optional: If you want the fancy version in an enclosure, also get the following: two SPST
switches
two spring-loaded switches one 1M potentiometer one 20K potentiometer one 1/8" stereo jack some small wire an enclosure Optional: run wires from the potentiometer holes to the large potentiometers. Also extend the LED with wires. Connect everything according to the picture below:  Here's an exploded view:  Place everything inside an enclosure so it looks like this:  This modification makes the invervalometer work with a single 9v battery and doesn’t make a “ticking” sound associated with a relay. Battery life is also greatly improved. The only other issue is that you need to make sure the voltage circulates the right way through the transistor, or it won’t work.  The output to
the camera is a standard 1/8" jack plug (a.k.a. heabphone
plug) which is handy because you can extend the wire with any headphone
extension. The camera end can be connected as explained here. The output to
the camera is a standard 1/8" jack plug (a.k.a. heabphone
plug) which is handy because you can extend the wire with any headphone
extension. The camera end can be connected as explained here.Click a heading above or just click NEXT PAGE. |