|
Wondering
how to make stereo images? If you’re not familiar with the concept, check out
what Wikipedia
has to say about it. Described below is my attempt to do interesting
portraits using two synced SLR cameras.
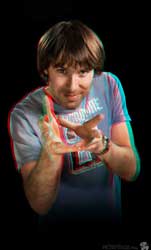
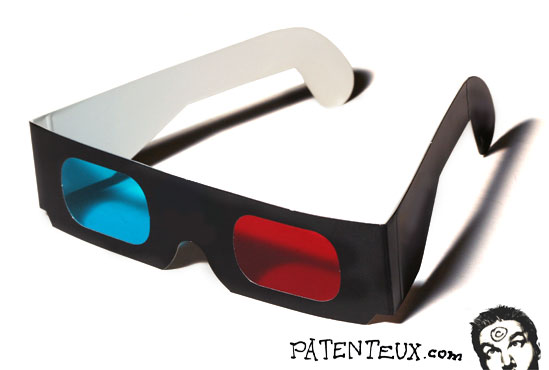
Viewing Stereo Images
 These
images are combined using the anaglyph method (using coloured
glasses), since most people have a hard time getting cross-eyed
viewing to work. Also, everyone has a pair of
paper glasses they got from a cereal box or SI Swimsuit issue.
If you don't have any glasses, you can get some cheap paper ones here
or some really good plastic
ones. What you need is red-cyan glasses,
with red on the left eye. These
images are combined using the anaglyph method (using coloured
glasses), since most people have a hard time getting cross-eyed
viewing to work. Also, everyone has a pair of
paper glasses they got from a cereal box or SI Swimsuit issue.
If you don't have any glasses, you can get some cheap paper ones here
or some really good plastic
ones. What you need is red-cyan glasses,
with red on the left eye.
To get the most out of these images, view them in a dim room and step back
and forth until the effect seems at its best. Viewing them against black also
helps. Sometimes I like to zoom in/out the picture and pan around. You can
try ACDSee
to view them as it's really good with zooming in/out on black.

Making 3D Images - A Little Theory
  The
principle of Stereoscopy is to take two pictures that are taken with a slight
horizontal offset. The resulting images are then displayed to a single eye.
The brain does the job of merging the two together in a single image. A good
3D image will trick the viewer into perceiving depth in an otherwise flat
image. The
principle of Stereoscopy is to take two pictures that are taken with a slight
horizontal offset. The resulting images are then displayed to a single eye.
The brain does the job of merging the two together in a single image. A good
3D image will trick the viewer into perceiving depth in an otherwise flat
image.
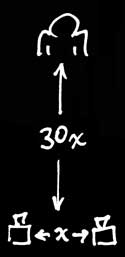
The offset between human eyes being on average 65mm, one would expect that
this should be used as the typical distance between cameras. In practice,
though, the distance between the cameras may vary greatly depending on a
number of factors, including the range between near and far objects, the
amount of perceived depth desired and the screen size on which the images
will be viewed. For starters, if the objects being photographed are far away,
you need to increase the distance between cameras (called inter-axial)
to preserve depth perception. Same with objects that are really close; you
need to decrease the offset, or else the brain won't be able to merge the
images together. The rule of thumb is that the offset should be at a maximum
of 1/30 of the camera-to-subject distance (e.g. a subject that is three
meters away should have an offset of ten centimeters). This rule is certainly
not set in stone. You could increase the distance in an attempt to boost the
"3D effect", but you would run the risk of making the images too
different for the brain to merge them. In any case, a smaller inter-axial
distance is preferable, especially if you intend to display your images on a
large screen.
If
you really intend to make a comfortable and optimized 3D image, you need to
choose the inter-axial distance carefully, as this setting cannot be modified
in post-production. I strongly recommend using a stereoscopic camera
calculator such as the many stereoscopic iPhone apps available, or better yet
the handy and free
spreadsheet found on binocularity.org (which is a pretty amazing website
for 3D photography).
In case you're really interested going deeper into the subject, here is a very technical
manual that covers the theory behind
stereoscopy (elaborate math included). Better yet, you can always take a look
at Bernard Mendiburu’s 3D
TV and 3D cinema: Tools and Processes for Creative Stereoscopy.
Single Camera Stereoscopy – Fast and Easy
My
friend Francois and I wanted to experiment with stereoscopy with digital
cameras for a while. Since we worked in 3D and VFX, we did get a chance to do
some stereo with computer generated elements. I did try experimenting with a
single camera on a sliding plate (such as this really cheap macro rail
available on eBay). In this case you just slide the camera left, take a
picture, slide it to the right, and take a picture again. What’s really nice
about this method is that you can use any inter-axial distance you want
(great for macros). Just make sure to lock all settings manually on the camera
before taking your shots.
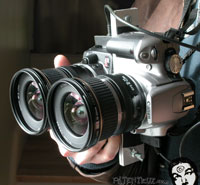
Dual-Camera Stereoscopy
The issue is that I wanted to take pictures of people in
motion, and I couldn’t since they moved during the time it took me to slide
the camera. Luckily, my friend François happened to own a camera and lenses that matched mine
(350D / rebel XT with 50mm f/1.8 and Canon 10-22mm). This meant that we could
finally try dual-camera stereo imaging!
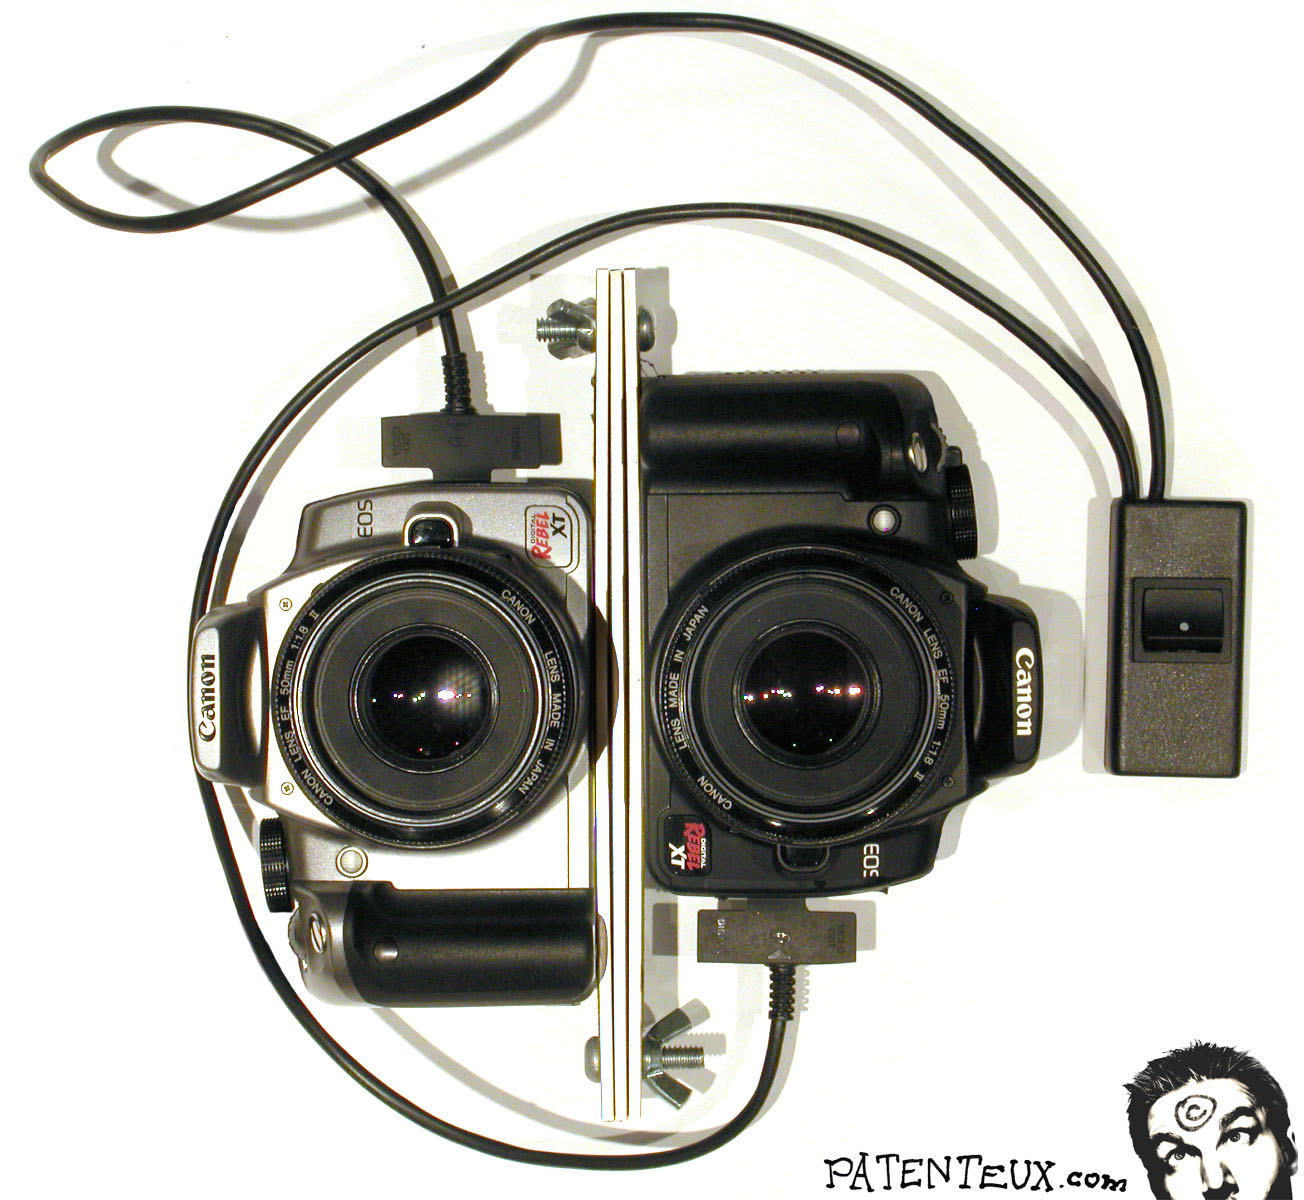
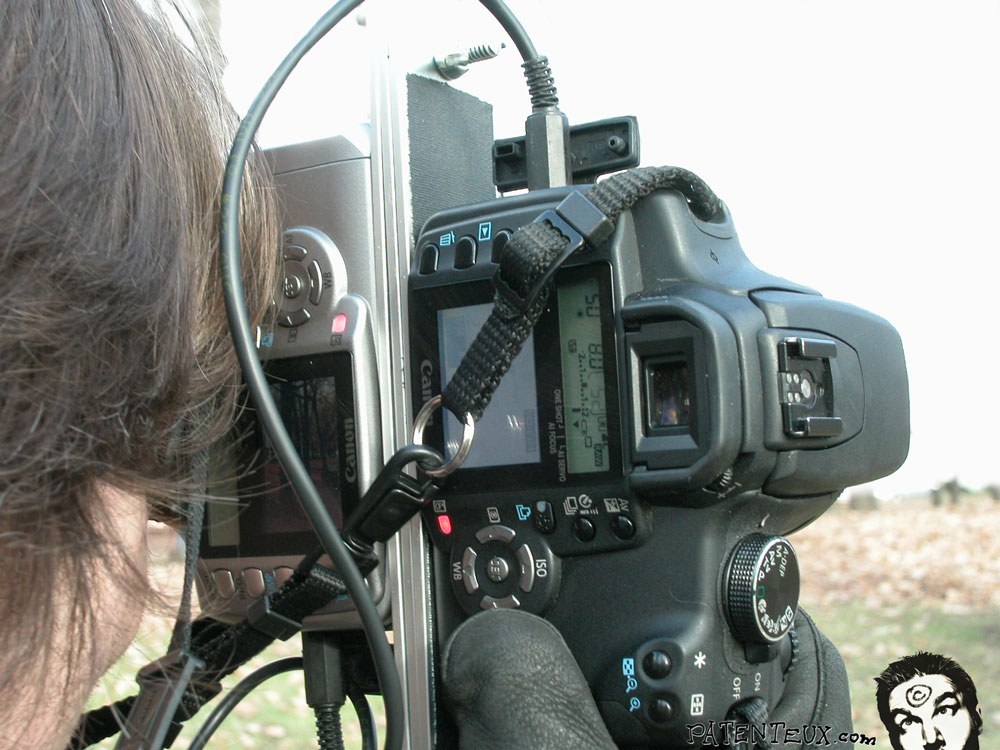
The Rig
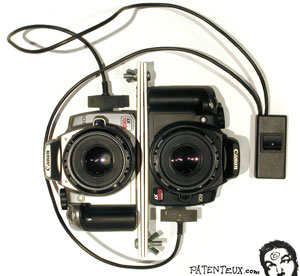 The
challenge was to get the two camera lenses as close to one another as
possible. Typically the distance between human eyes is 65mm, so as a starting
point we usually want to match this distance between lenses to get a
realistic effect at a reasonable distance. In this case we got 100mm of
separation, which gives a great effect but is a bit exaggerated. If you try
to increase the distance between cameras too much, the brain just gives up trying
to reconnect the images. The
challenge was to get the two camera lenses as close to one another as
possible. Typically the distance between human eyes is 65mm, so as a starting
point we usually want to match this distance between lenses to get a
realistic effect at a reasonable distance. In this case we got 100mm of
separation, which gives a great effect but is a bit exaggerated. If you try
to increase the distance between cameras too much, the brain just gives up trying
to reconnect the images.
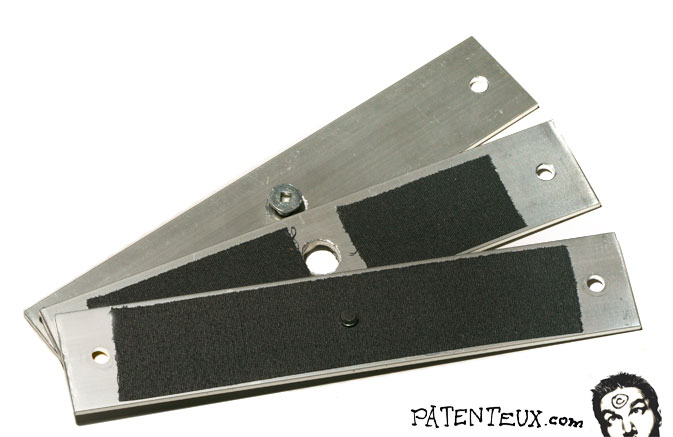
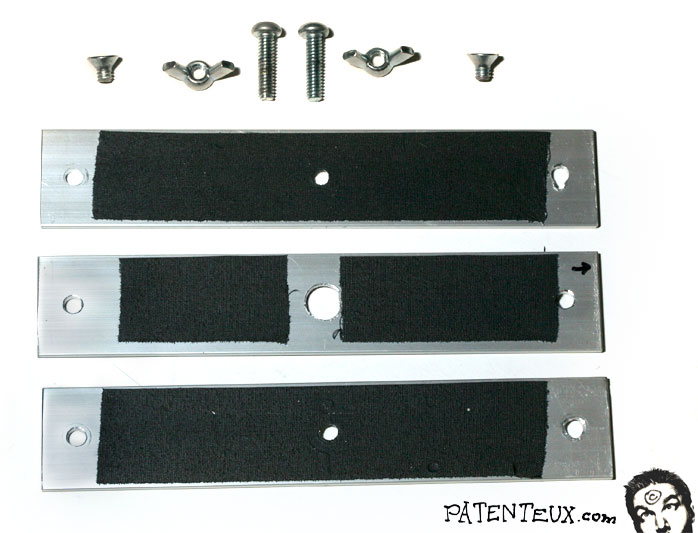
 I
created a custom rig to line up the two cameras. I used an aluminum bar
commonly found in hardware stores and cut it into three equal pieces. It can
be cut easily with a hacksaw. I stacked the three pieces, clamped them and
drilled three holes on the drill press (the aluminum is soft enough to use
regular wood/metal bits). I filed all edges. Gaffer tape was used to prevent
the strips from slipping. I
created a custom rig to line up the two cameras. I used an aluminum bar
commonly found in hardware stores and cut it into three equal pieces. It can
be cut easily with a hacksaw. I stacked the three pieces, clamped them and
drilled three holes on the drill press (the aluminum is soft enough to use
regular wood/metal bits). I filed all edges. Gaffer tape was used to prevent
the strips from slipping.
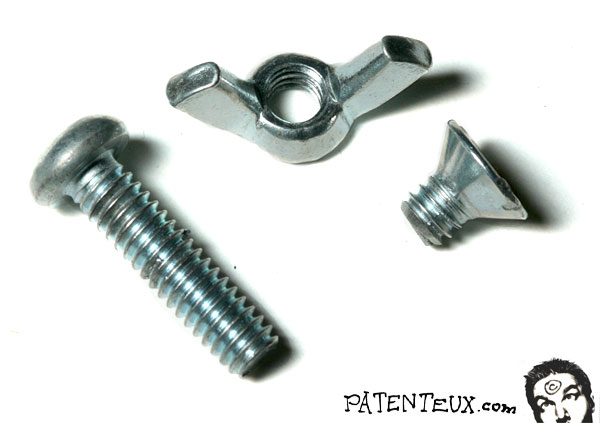
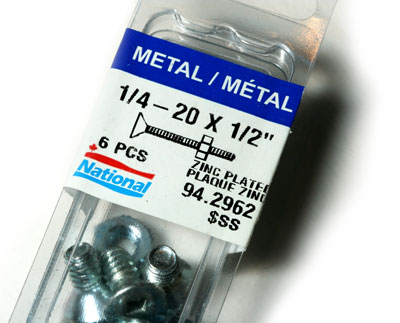
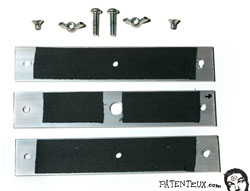 Each
camera is attached to its own strip using a screw that has the same size and thread
as the camera’s tripod mount. These are flat-head
¼ inch diameter 20 thread screws
(typically the most common ¼ inch screws available in hardware stores). Since
I had a hard time finding the right length (3/8 inch) I got longer ones and
cut them. If you decide to do this, remember to screw on a nut before cutting
the bolt. This will straighten the thread when you unscrew it and will give
you something to clamp onto when cutting it (note that you can use a hacksaw or
a grinder). Remember to file the cut edge and bevel it a little bit. Each
camera is attached to its own strip using a screw that has the same size and thread
as the camera’s tripod mount. These are flat-head
¼ inch diameter 20 thread screws
(typically the most common ¼ inch screws available in hardware stores). Since
I had a hard time finding the right length (3/8 inch) I got longer ones and
cut them. If you decide to do this, remember to screw on a nut before cutting
the bolt. This will straighten the thread when you unscrew it and will give
you something to clamp onto when cutting it (note that you can use a hacksaw or
a grinder). Remember to file the cut edge and bevel it a little bit.
 The
middle hole on each bar should be countersunk with a larger diameter bit so
the bolt heads will be a little recessed. Since I couldn’t drill the middle
holes enough to completely recess the heads, I used a third bar between the
two others as a spacer. I enlarged the middle hole to allow clearance for the
bolt heads. The
middle hole on each bar should be countersunk with a larger diameter bit so
the bolt heads will be a little recessed. Since I couldn’t drill the middle
holes enough to completely recess the heads, I used a third bar between the
two others as a spacer. I enlarged the middle hole to allow clearance for the
bolt heads.
I then screwed the bars to each camera using the shortened bolts. All bars were
then attached together with longer bolts and wing nuts. The result was quite
rigid.
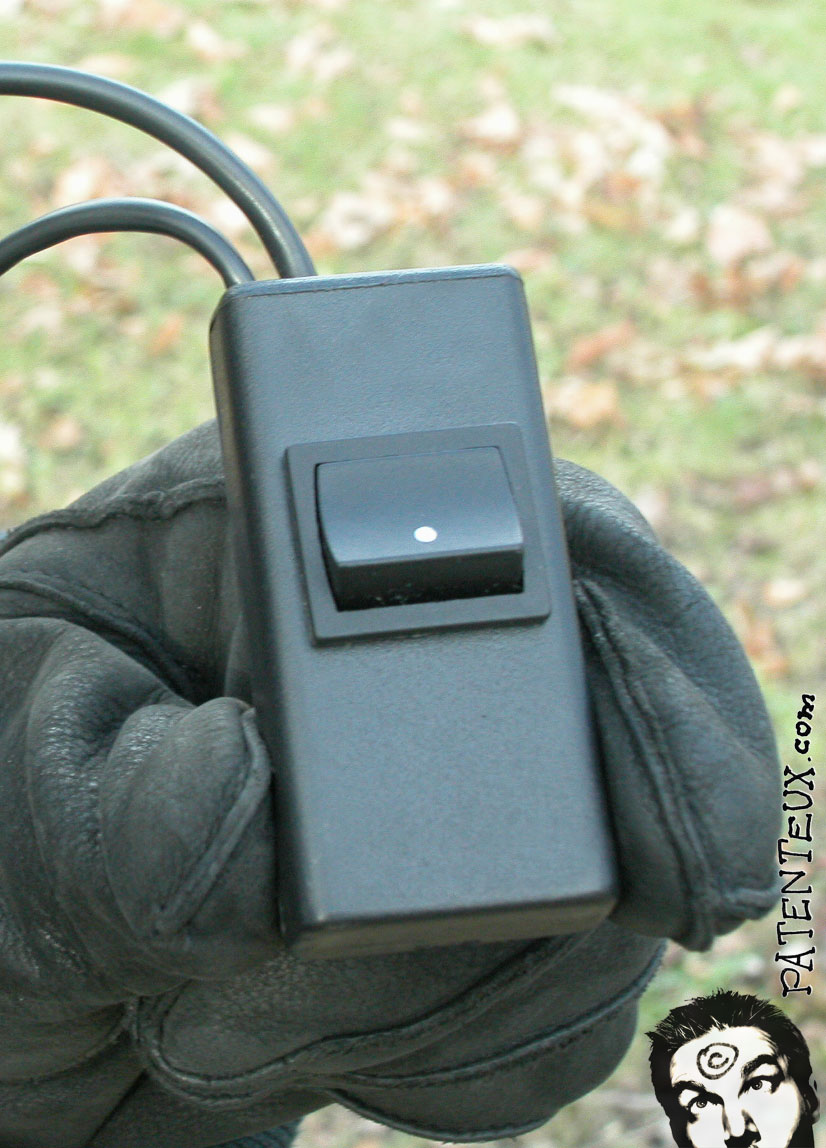
The
Remote
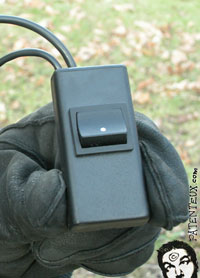 The
details of making a remote can be found on the connections
page. In this case I ran wires from the remote plugs on each camera and
connected them to a DPST switch (which is a double pole switch – two switches
in one). The switch connects the tip and the base of the 2.5mm jack – this
triggers the shutters. I then tucked the switch and the wires in an empty
enclosure. The
details of making a remote can be found on the connections
page. In this case I ran wires from the remote plugs on each camera and
connected them to a DPST switch (which is a double pole switch – two switches
in one). The switch connects the tip and the base of the 2.5mm jack – this
triggers the shutters. I then tucked the switch and the wires in an empty
enclosure.
The latter version included an AF button to make sure both cameras were focus
locked on the subject before the shutter was triggered (thus preventing any
focus delay).
Shooting
Technique
 Make
sure both cameras have exactly the same settings, all set to manual
(the eye is very sensitive to discrepancies between images. This includes WB,
saturation, sharpening, everything. We used RAW to avoid any problems, and
this affords us a lot more latitude when post-processing the images. If you
plan on using flash (see below), use a slow shutter speed to make sure that
both shutters stay open until the flash has fired. Also, make sure the date
and time matches exactly on both cameras. This will make it a lot easier to
join the pairs, as you just need to sort the folder of images by date. Make
sure both cameras have exactly the same settings, all set to manual
(the eye is very sensitive to discrepancies between images. This includes WB,
saturation, sharpening, everything. We used RAW to avoid any problems, and
this affords us a lot more latitude when post-processing the images. If you
plan on using flash (see below), use a slow shutter speed to make sure that
both shutters stay open until the flash has fired. Also, make sure the date
and time matches exactly on both cameras. This will make it a lot easier to
join the pairs, as you just need to sort the folder of images by date.
1st
Attempt – Available Light
  This
is a test of the original rig, using available light. We quickly realized
that using a 50mm was much better than 10 or 20mm, because at that focal
length, you need to get really close to the subject and the difference
between the points of view is too great for your brain to make the
connection. Here is a
failed example at 10mm. This
is a test of the original rig, using available light. We quickly realized
that using a 50mm was much better than 10 or 20mm, because at that focal
length, you need to get really close to the subject and the difference
between the points of view is too great for your brain to make the
connection. Here is a
failed example at 10mm.
What came of this exercise is that since we only had control over the shutter
and not AF, the focusing time between cameras varied. We could have used
manual focus, but it’s really difficult on two separate cameras to get the
same focus, and the 50mm 1.8 has a notoriously flimsy focusing ring. We set
forth to include focus control on or remote so we could lock the focus before
we triggered the shutters.
2nd
Attempt – Indoors With Flash
 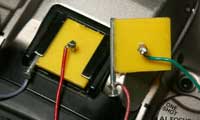 This
time was much more fruitful. I decided to use some strobes, but the flash
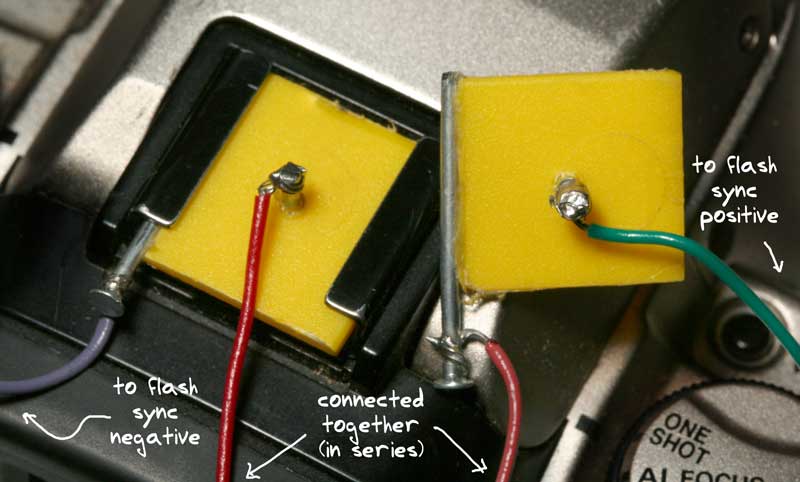
sync was an issue. I got the idea to connect the flash sync to each camera in
series. I made a basic hot shoe adapter. It's quite rudimentary, but it
works. It's made out of two pieces of plastic, nails and a few wires. For
those who don't understand the principle behind a hot shoe, check this out. This
time was much more fruitful. I decided to use some strobes, but the flash
sync was an issue. I got the idea to connect the flash sync to each camera in
series. I made a basic hot shoe adapter. It's quite rudimentary, but it
works. It's made out of two pieces of plastic, nails and a few wires. For
those who don't understand the principle behind a hot shoe, check this out.
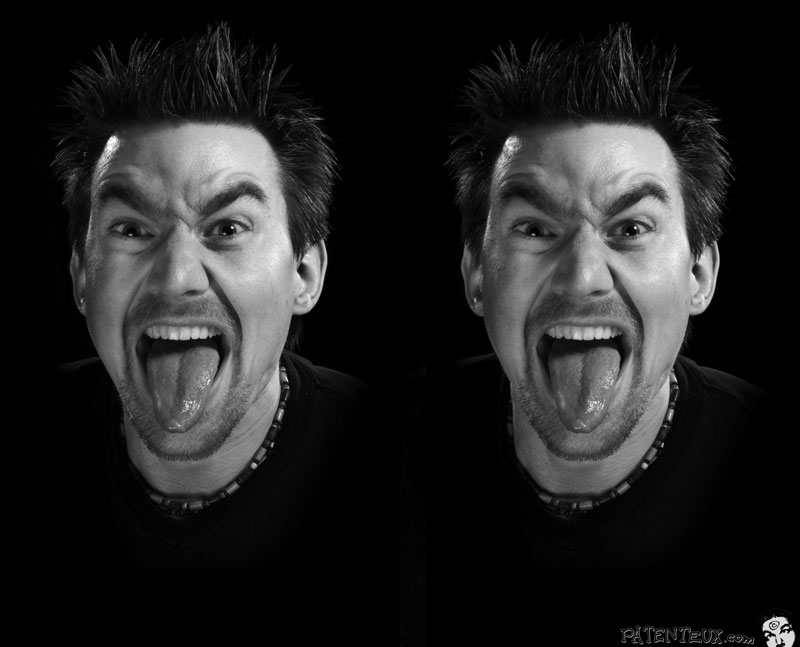
In this case we also used a tripod, which definitely helped getting more
accurate framing of the subject. We also shot on black, which helps convey
the sense of depth. Another “rule” is to avoid intersecting the foreground
subject with either side of the frame (this disrupts the 3D effect near the
edges – also called a stereoscopic window violation).
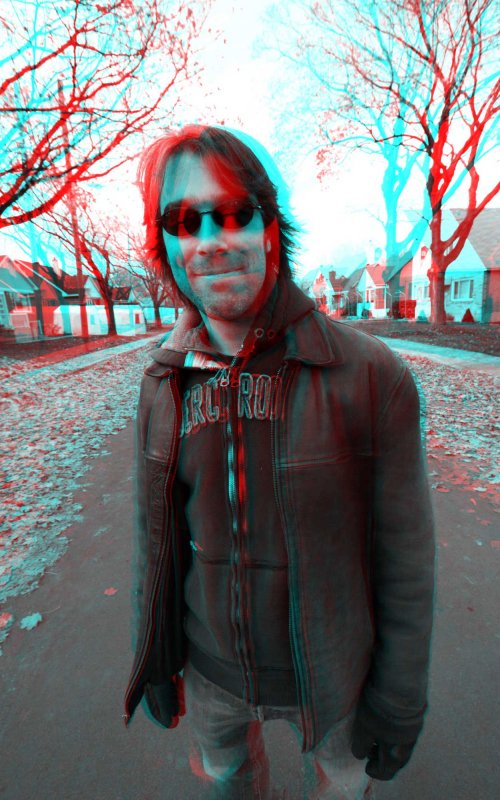
All in all, we got some pretty good results. We tried different shots, which
can all be seen in my gallery.
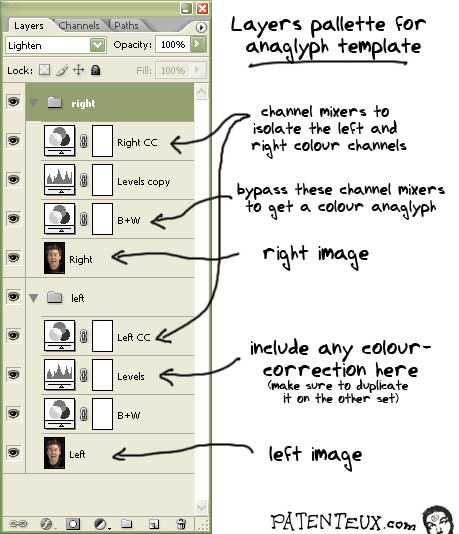
Combining the Pictures
 In
this case Photoshop was used; instead of some of the specialized software you
can find on the web (you can also try the free Stereo Photo Maker, which is
great). This provides a lot more latitude, and you can even retouch the final
composite. I was looking for a simpler solution than replacing the red channel
(as is mentioned in most other tutorials). Instead I ended up creating two
layer sets with layer effects to divide the channels. This allows for better
color correction when the shots are combined, and allows for easy conversion
from color anaglyph to black-and-white anaglyph (I'm a stickler for good b+w
tone). In
this case Photoshop was used; instead of some of the specialized software you
can find on the web (you can also try the free Stereo Photo Maker, which is
great). This provides a lot more latitude, and you can even retouch the final
composite. I was looking for a simpler solution than replacing the red channel
(as is mentioned in most other tutorials). Instead I ended up creating two
layer sets with layer effects to divide the channels. This allows for better
color correction when the shots are combined, and allows for easy conversion
from color anaglyph to black-and-white anaglyph (I'm a stickler for good b+w
tone).
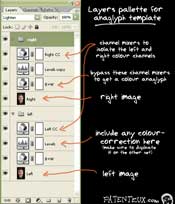
I'd like to share my Photoshop template.
Replace the left and right layers in this template with your own images.
Remember to line up the images so they converge on the object you intend to
be in the plane of the monitor (i.e. what is lined up will appear at the
depth of the monitor surface). You can then play with the adjustment layers
to get the contrast just right (make sure to apply whatever changes you make
on one eye to the other). Note that if you hide the B+W adjustment layers,
you will get a color anaglyph.
If you plan on trying this, let me
know how it turns out.
|


