The ProblemWhen looking for old family photographs. I realized all the pictures from the 70s and 80s we had were shot on slides. We’re talking thousands of pictures here. As expected, they were lying in boxes, and many of them had only been looked at only once, and forgotten about since. The only way to bring this collection back to life was to convert it to digital format. This is easier said than done. The SolutionI could have gotten my hands on a slide scanner but that would have been expensive, and the only way not to insert the slides one by one would have been to get a stack loader, which is an additional expense, and apparently requires a lot of assistance. You can’t just let it scan 100 slides and expect it not to get clogged. Also, a slide scanner digitizes at about 10-30 seconds per slide. When you have thousands, it can add up. I
was looking for a
cheaper and faster alternative, so I
started thinking that I could use the transport mechanism of a slide
projector
and use a camera with a macro lens to digitize the slide. After a few
iterations, this is what I got: I admit it’s not pretty, but it works. You can try to build one if you like. Here’s the principle: The slide projector is an old Sawyer model, and I just removed the lens. A camera with a macro lens is pointing at the exposed slide inside. It is on a sliding plate to make it easier to get things framed and in focus. Inside the projector, I removed the halogen bulb (it was too bright), the condenser and the reflector. I replaced it with a photo enlarger bulb, which is a regular 100w bulb, but noticeably more frosted, providing very even light. I was planning on making a diffuser, but after shooting a few blank slides, I realized that the light was even enough, and this step was not required. Managing DustIn
my early tests, I
noticed that dust was a problem.
Commercially available slide scanners have dust reduction systems
(usually
infrared), but mine obviously doesn’t. Instead I chose to spray
compressed air on
both sides of the slide with correctly aimed copper pipes. These are
connected
to an air compressor (any kind will do, airbrush, workshop, etc. - you
can also
try a compressed air cylinder). Eventually I improved the design by
making an
electrically-controlled solenoid valve that a mechanical engineer
friend gave
me. He also gave me clear tubing and fittings which made connections
easier.
Compression fittings can also be used. If you can’t get your hands on a
solenoid valve (I hear they’re expensive), you can always try a
dishwasher
solenoid valve.
The
camera is set to
manual settings (explained later) and
the shutter is remotely controlled through a wire connected like this.
Hooking it upThe transport mechanism on the projector is controlled via its remote wire input plug, and I hacked a connector to fit in this weird plug. It was pretty simple to figure out how it works: touch two contacts and it advances one slide. Touch two other contacts and it changes direction. The focus contacts are ignored, as focusing is handled on the camera side. Eventually I connected everything to an enclosure with buttons. It’s not very clean, but it definitely helps speed things up. How it WorksNow by pressing the three buttons sequentially it: · Advances to the next slide · Blasts air on both sides of the slide · Takes a picture of the slide. The
camera is
connected directly to the computer via USB, so
images are transferred and displayed immediately after taking the shot.
Camera SettingsThe camera is usually set to manual focus and Aperture priority (f8.0). Some people would probably state that a full manual exposure would be better here, but since old slides can vary wildly in terms of density (exposure), the camera needs to adapt to these varying light levels. Since I want to make sure the entire slide is properly exposed, I try to set the metering to its widest area possible, or else it will be thrown off by light or dark objects in the center of the frame. Post-ProcessingAs for the pictures, I usually try to fix them up. Sometimes the rotation/flipping is wrong, and sometimes the cropping needs touching up. Also sometimes the color in the original is off, or has faded. Shooting slides makes for flatter shots than the original, so I make sure to fix the contrast in post-processing. I take this opportunity to improve the scans digitally. For this purpose, I shoot in RAW format. This allows for more bit-depth and no compression artifacts. It also allows to “tweak” the white balance (which is quite an issue with slide film). I’ve also used batch conversion software such as Phase One C1 Capture Pro (you can download a trial version here). The other issue is cropping. Do you rotate every shot before shooting it so it matches the camera’s orientation, or pull back and make sure both slide orientations fit within the frame? Both solutions are good. The first one makes better use of your camera’s resolution, but is tedious to rotate at every frame. This really slows you down when you’re trying to go quickly. The second option (pulling back and shooting, whatever the orientation) allows you to shoot all slides quickly, but you’ll lose resolution in the end. Considering that the slides may have that much detail to begin with, sometimes this is something you can afford to do. You can see by these examples that the result can be quite acceptable. Keep in mind that these images are well over 30 years old and faded (click to enlarge to full res).
These
were shot in RAW. After a little post-processing, it gives
a pretty amazing result. Below, I've got a very dramatic example. Roll over the image to see a before-after
view: 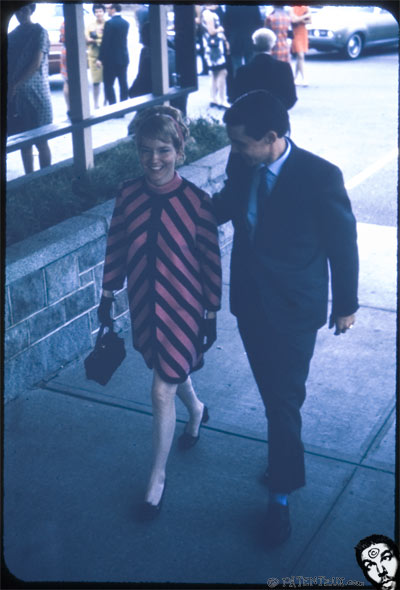
If you try it, let me know how it turns out. |


